Collect Data with iOS
This guide will show you how to collect data in an iOS application without touching the data.
Key concepts in this guide:
Getting Started
To get started, you will need a Basis Theory account.
Next you will need a Public Application in order to use iOS Elements for your app.
Click here to create a Public Application or login to your Basis Theory account and create a new application with the following settings:
- Name - Collect Data from iOS Guide
- Application Type - Public
- Permissions -
token:create
Setup the Project
We will create a new iOS application through Xcode. If you don't have Xcode, download it through the Mac App Store.
-
Launch Xcode, then click “Create a new Xcode project”. In the sheet that appears, select "iOS" for the target operating system and the "App" template under Application, then click Next.
-
For the Product Name enter "Collect iOS Guide", and for the Organization enter your own name. Ensure StoryBoard and Swift are selected for the Interface and Language, then click Next.
-
On the next screen save the project, wherever you'd like.
This will launch Xcode with the newly created project.
Install the iOS Elements SDK
We will need to install Basis Theory's iOS Elements SDK, which will render a secure UITextField for capturing the data.
With the Xcode window in focus, select File > Add Packages. In the dialog that appears, enter https://github.com/Basis-Theory/basistheory-ios in the search field on the top right, then click Add Package on this screen and the next prompts.
Add Your Form Components
Now we need to add TextElementUITextField iOS element component to our app.
The easiest way to add a TextElementUITextField is to first drop a UITextField onto your Main.storyboard file. To do this open the Main.storyboard file, and click on plus button on the top right and search for "UITextField" in
the dialog that appears. Now drag and drop the Text Field component anywhere on the iPhone screen. Feel free to size the UITextField to your liking.
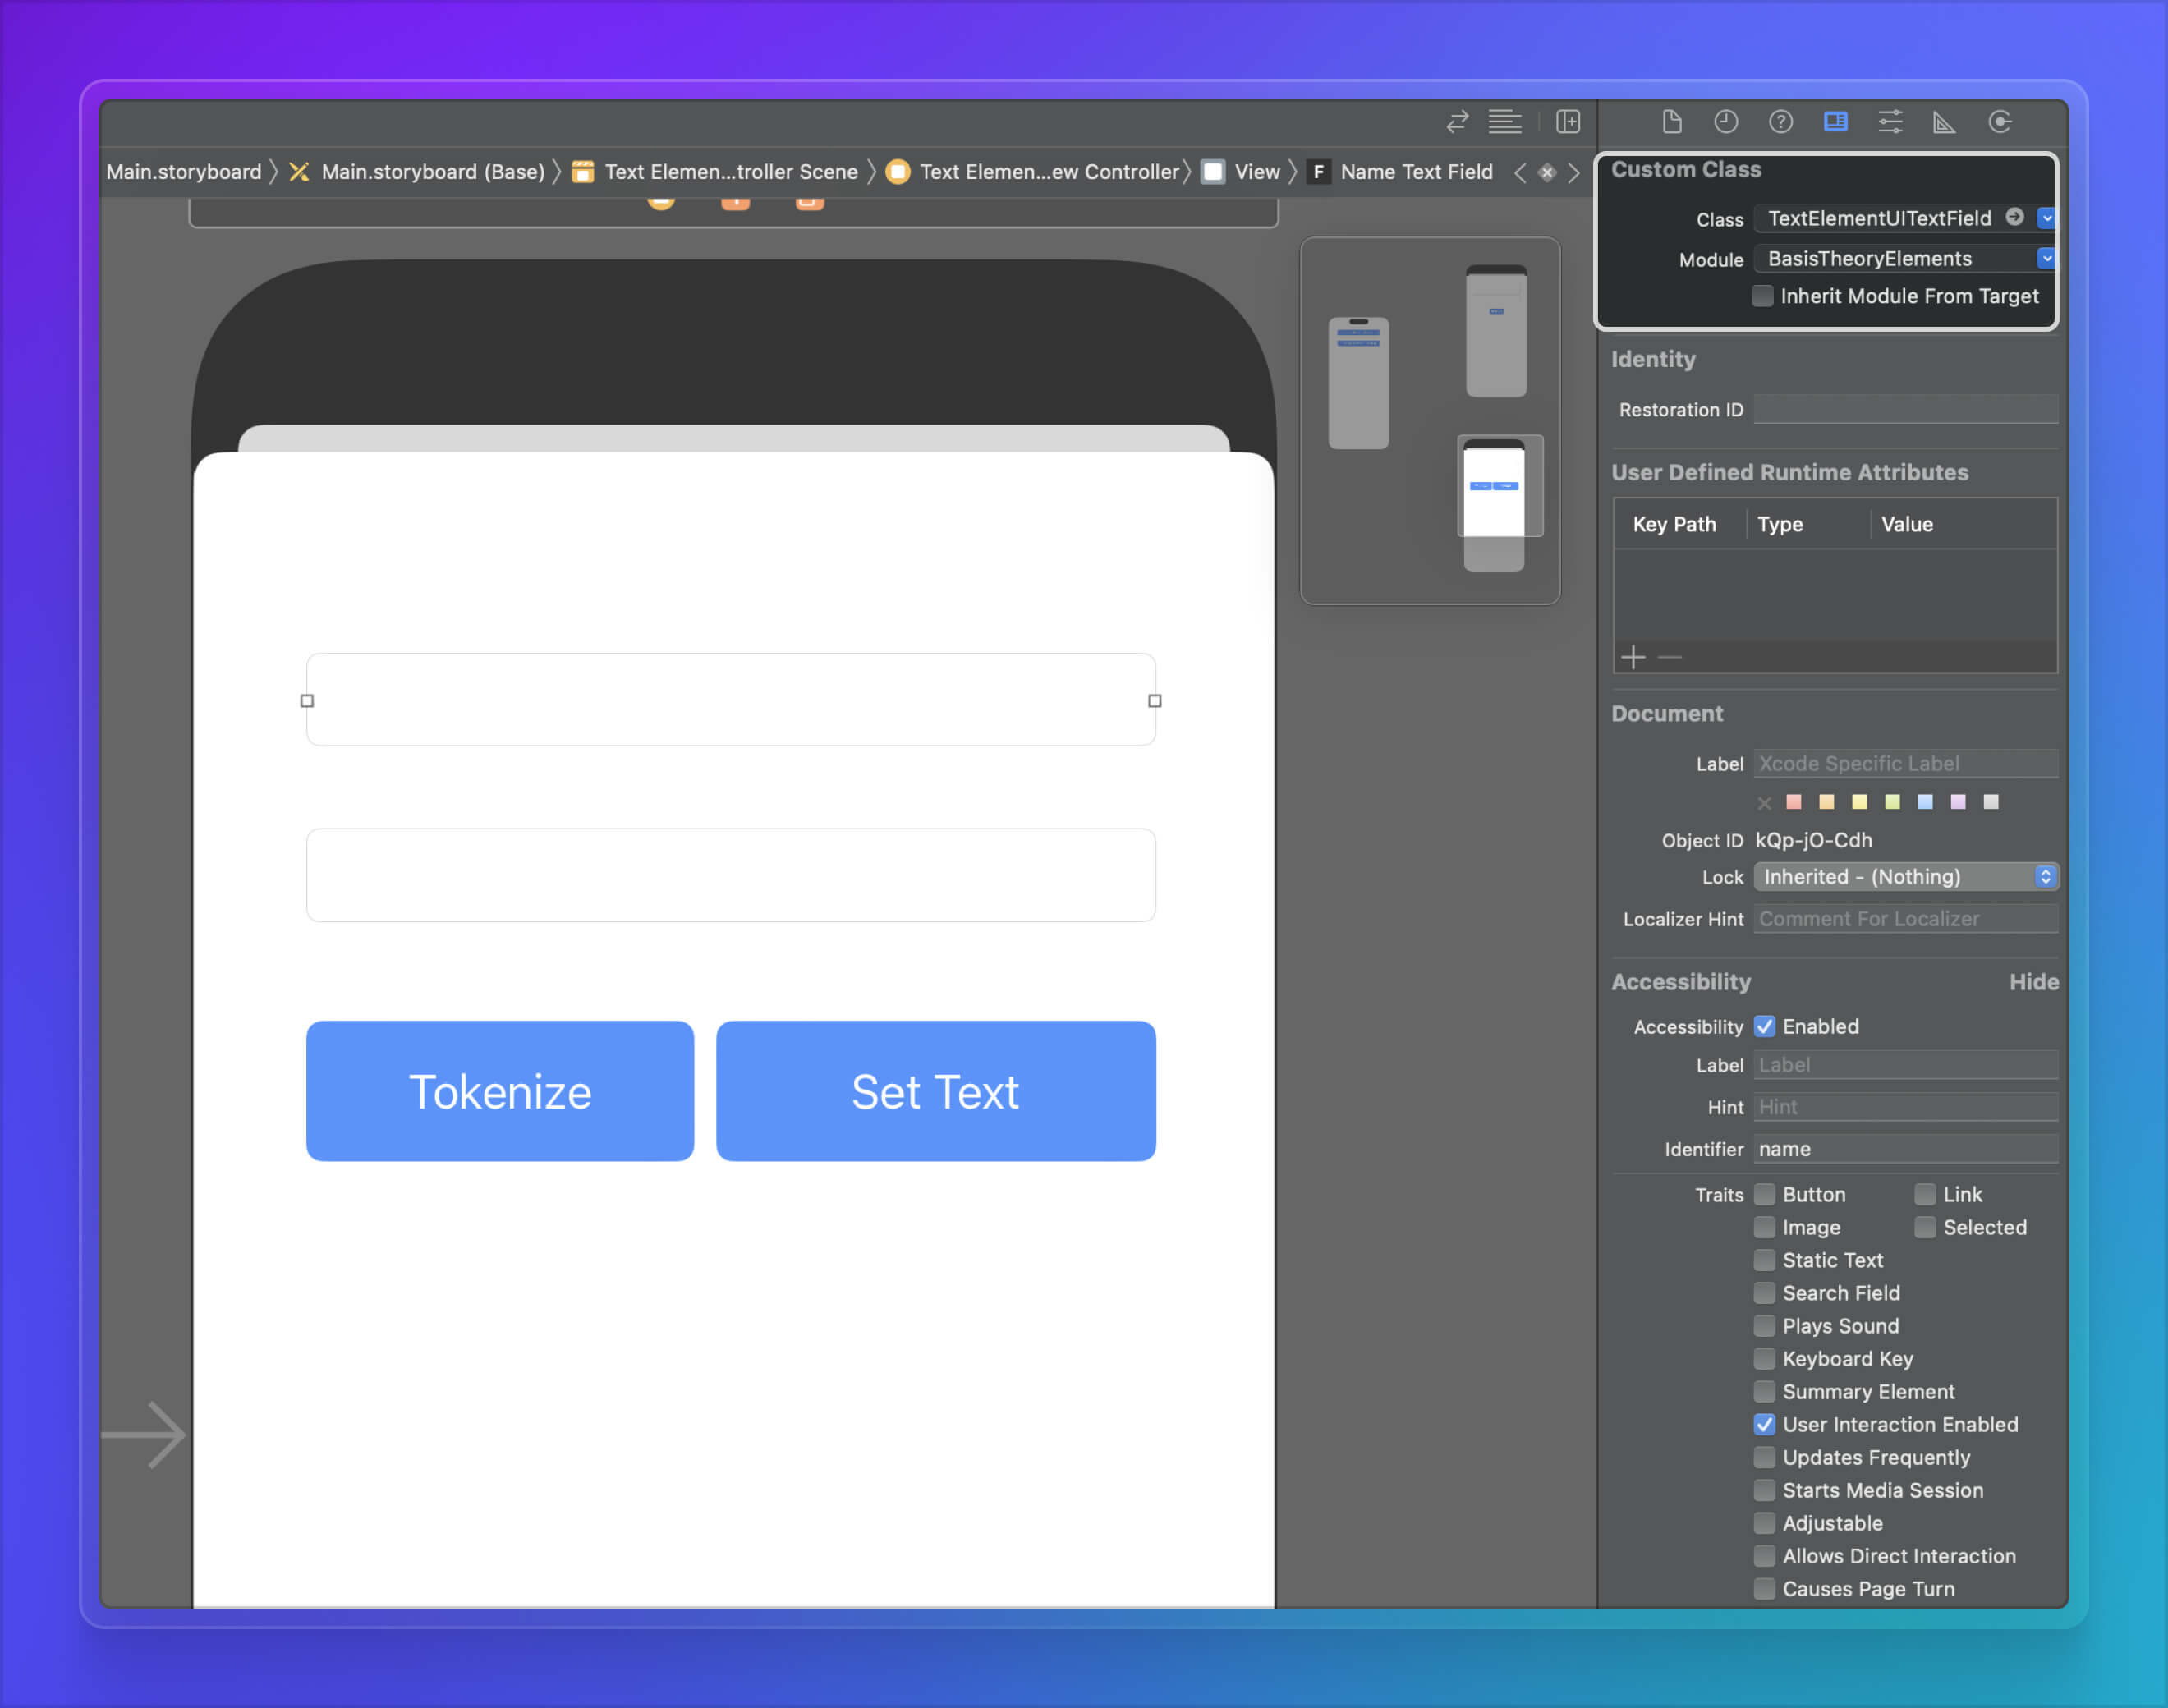
With the new UITextField selected, open up the Identity Inspector on the right and select TextElementUITextField from the class drop down, similar to the image below.

Style Your Form Components
Now it's time to style our new TextElementUITextField. We'll be styling our element programmatically, but feel free to style it through the GUI on Xcode, or even try implementing your own styles!
First we need to add an outlet to our ViewController.swift so that we're able to manipulate the text field programmatically. To do this, ensure your Main.storyboard file is open and click on the "Add Editor to the Right" button
on the top right. Here's a helpful image below:

Clicking on the button above will open the Main.storyboard on a new pane on the right. Now in the Project Navigator on the left, click on the ViewController.swift file. This should replace the Main.storyboard file on the right pane.
Next, we control-drag from the TextElementUITextField in Main.storyboard to the top of our ViewController class in the ViewController.swift file on the right. In the window that appears, type in "ssnTextElement" for the
Name and click Connect. Then Xcode should suggest you import BasisTheoryElements, so let's go ahead and do that now.
You should have something similar to the following for ViewController.swift after these steps.
import UIKit
import BasisTheoryElements

class ViewController: UIViewController {
    @IBOutlet weak var ssnTextElement: TextElementUITextField!

    override func viewDidLoad() {
        super.viewDidLoad()
        // Do any additional setup after loading the view.
    }
}
We'll use the new ssnTextElement outlet to style our new element. Let's write some statements to style our component.
import UIKit
import BasisTheoryElements

class ViewController: UIViewController {
    @IBOutlet weak var ssnTextElement: TextElementUITextField!

    override func viewDidLoad() {
        super.viewDidLoad()
        // Do any additional setup after loading the view.

        ssnTextElement.layer.cornerRadius = 15.0
        ssnTextElement.layer.borderWidth = 1.0
        ssnTextElement.layer.borderColor = UIColor.blue.cgColor
        ssnTextElement.layer.masksToBounds = true
        ssnTextElement.placeholder = "Enter SSN"
        ssnTextElement.backgroundColor = UIColor( red: 200/255, green: 200/255, blue: 200/255, alpha: 1.0 )
    }
}
As you can see above, we take advantage of the existing UITextField API to style our component. All of our iOS elements extend UITextField for ease of use and speed to production.
Add a Mask to Text Element
Let's add a mask to format the input as the user types in the text field. The following sets a mask that looks like a social security number (ie. ###-##-####).
import UIKit
import BasisTheoryElements

class ViewController: UIViewController {
    @IBOutlet weak var ssnTextElement: TextElementUITextField!

    override func viewDidLoad() {
        super.viewDidLoad()
        // Do any additional setup after loading the view.

        let regexDigit = try! NSRegularExpression(pattern: "\\d")
        let ssnMask: [Any] = [
            regexDigit,
            regexDigit,
            regexDigit,
            "-",
            regexDigit,
            regexDigit,
            "-",
            regexDigit,
            regexDigit,
            regexDigit,
            regexDigit,
        ]

        try! ssnTextElement.setConfig(options: TextElementOptions(mask: ssnMask))

        ssnTextElement.layer.cornerRadius = 15.0
        ssnTextElement.layer.borderWidth = 1.0
        ssnTextElement.layer.borderColor = UIColor.blue.cgColor
        ssnTextElement.layer.masksToBounds = true
        ssnTextElement.placeholder = "Enter SSN"
        ssnTextElement.backgroundColor = UIColor( red: 200/255, green: 200/255, blue: 200/255, alpha: 1.0 )
    }
}
Tokenize the Text Value
We want to be able to tokenize the value within TextElementUITextField without exposing it to our iOS app.
We need to add a tokenize UIButton and a function to handle the tokenization request. Open the Main.storyboard file, and click on plus button on the top right and search for "UIButton" in the dialog that appears and drag
and drop the Filled Button component anywhere under our TextElementUITextField. Let's change the name of this button to "Tokenize" by double-clicking on the new UIButton.
Now we need to add an action for this new button. Follow the previous steps from Style Your Form Components to get Main.storyboard and ViewController.swift files side-by-side. Control-drag
the "Tokenize" UIButton into ViewController.swift, then choose Action for the Connection and "tokenize" for the Name.
Now we'll add the following code to tokenize the data with Basis Theory.
import UIKit
import BasisTheoryElements

class ViewController: UIViewController {
    @IBOutlet weak var ssnTextElement: TextElementUITextField!

    @IBAction func tokenize(_ sender: Any) {
        let body = CreateToken(type: "token", data: [
            "ssn": self.ssnTextElement,
        ])

        BasisTheoryElements.createToken(body: body, apiKey: "<API_KEY>") { data, error in
            guard error == nil else {
                print(error)
                return
            }

            print(data)
        }
    }

    override func viewDidLoad() {
        super.viewDidLoad()
        // Do any additional setup after loading the view.

        let regexDigit = try! NSRegularExpression(pattern: "\\d")
        let ssnMask: [Any] = [
            regexDigit,
            regexDigit,
            regexDigit,
            "-",
            regexDigit,
            regexDigit,
            "-",
            regexDigit,
            regexDigit,
            regexDigit,
            regexDigit,
        ]

        try! ssnTextElement.setConfig(options: TextElementOptions(mask: ssnMask))

        ssnTextElement.layer.cornerRadius = 15.0
        ssnTextElement.layer.borderWidth = 1.0
        ssnTextElement.layer.borderColor = UIColor.blue.cgColor
        ssnTextElement.layer.masksToBounds = true
        ssnTextElement.placeholder = "Enter SSN"
        ssnTextElement.backgroundColor = UIColor( red: 200/255, green: 200/255, blue: 200/255, alpha: 1.0 )
    }
}
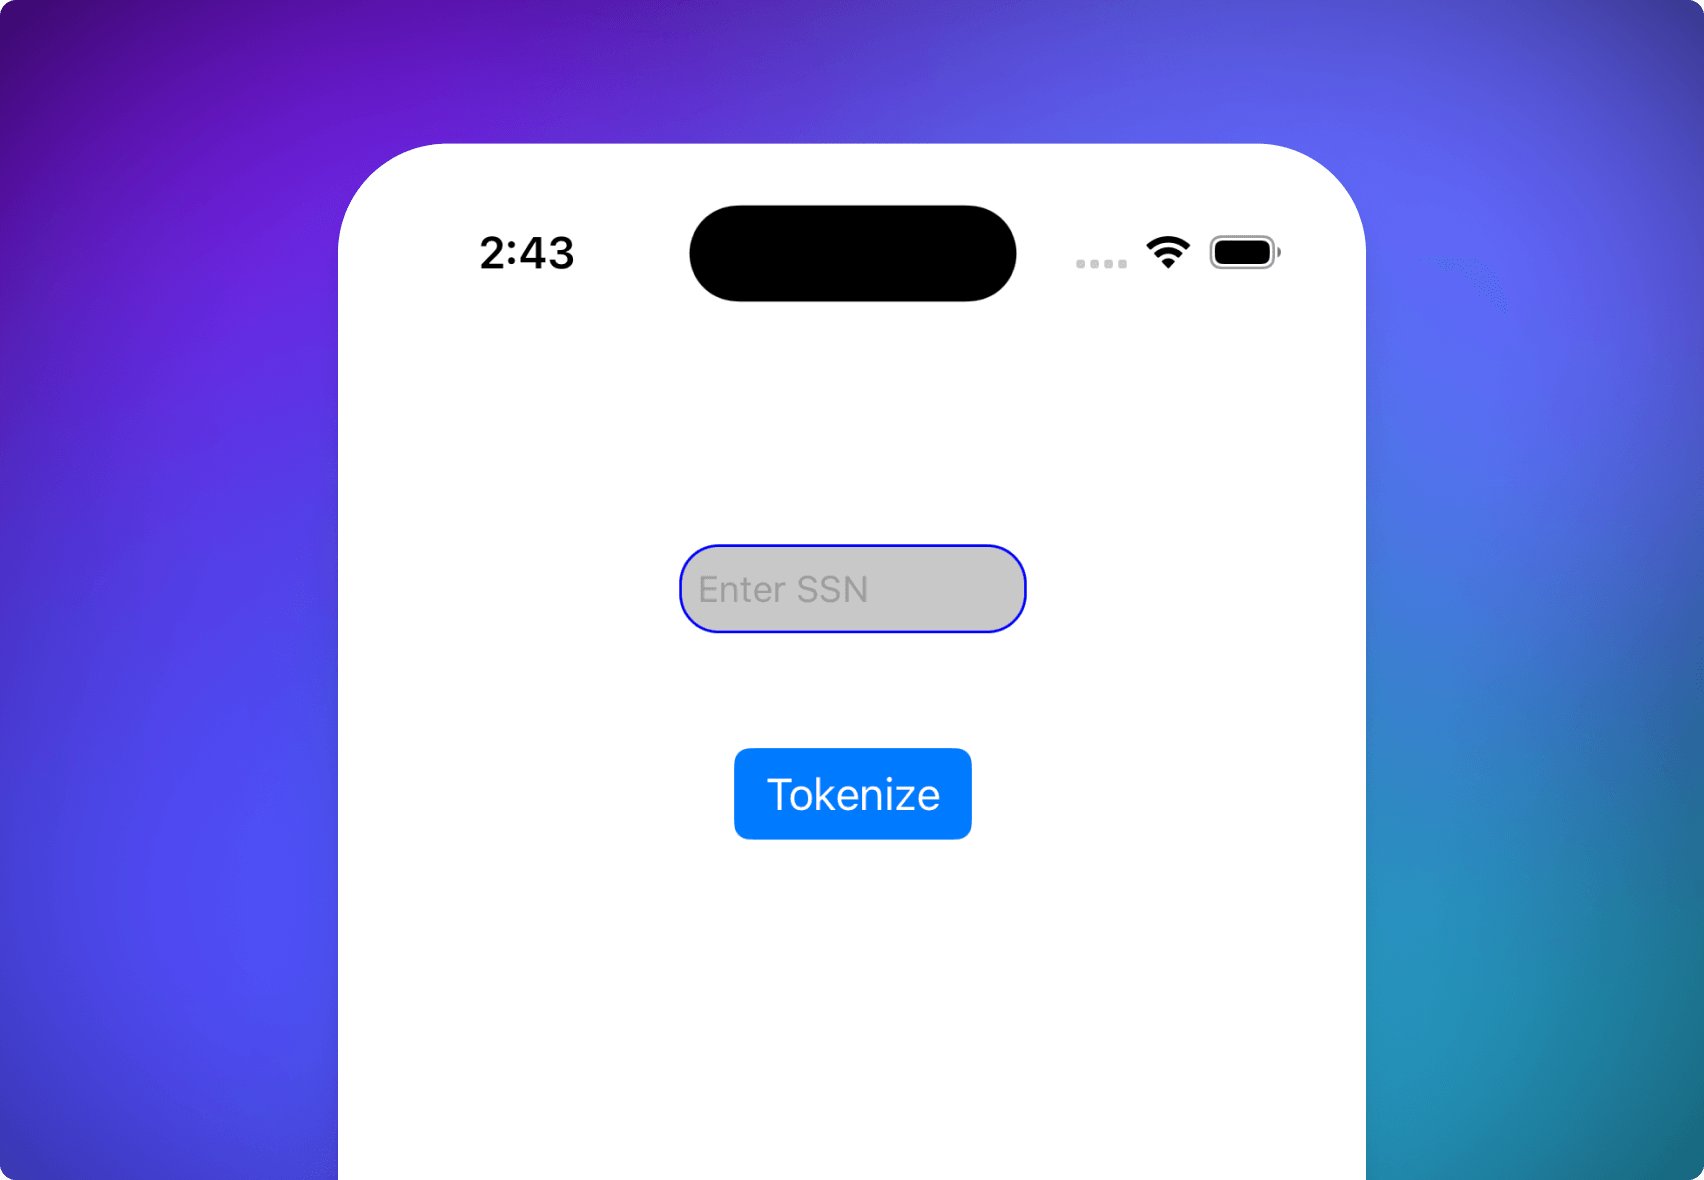
<API_KEY> with the Public API Key you created in the Getting Started step.🎉 The code above is the last bit that we need to tokenize! Now let's run the app by clicking on the play button on the top left. The screen should look something like this:

Conclusion
You can now capture any data without your iOS app accessing the underlying value drastically reducing compliance and regulatory scope.
Try typing in a social security number in the TextElementUITextField and tap on Tokenize. Basis Theory's iOS SDK will pass the value for the element reference. This will be securely submitted directly to the Create Token Endpoint. The resulting token is printed to the Xcode console.